Showing posts with label recipes. Show all posts

Friday, September 25, 2015

Sunkissed Infusions :: Herbal Teas for Health, Happiness & Energy

Sunkissed Dream // 4 Recipes for Herbal Teas promoting Health, Happiness & Energy


Herbal teas, or infusions, have wonderful healing powers. I've found a new love for tea since I started my journey to a more self-sustainable and natural lifestyle.
Drinking an infusion of specially selected herbs can be a great remedy for anything from a headache to a cold to menstrual cramps. You can drink them to promote general health and ward off colds and other sickness. Or you can simply make and drink them for their delightful and lovely look and taste. 

Sunkissed Dream // 4 Recipes for Herbal Teas promoting Health, Happiness & Energy

Here's 4 different infusions that I made recently for an Open House I hosted for my natural skin care business. Some were more popular than others (as far as taste).
I invite you to try these, or versions of these! I also invite you to research these herbs. I'd look into Mountain Rose Herbs, a well respected company that has in depth information and sells of all of these and A LOT more.
If you are pregnant, breast feeding or have a serious health issue,
be sure to contact your doctor before using any herbs.
 

  • ROSE (Rosa spp.) + HIBISCUS (Hibiscus sabdariffa) + LEMON BALM (Melissa officinalis) - This was a favorite!
    Lifts the spirit and promotes good health and positive energy
  • YARROW (Achillea millefoleum) + RASPBERRY LEAF (Rubus idaeus) + GREEN TEA
     Energizes and boosts immunity
  • NETTLE LEAF (Urtica dioica) + CALENDULA (Calendula officinalis) + PEPPERMINT (Mentha spp.)
    Helps relieve hay fever, congestion & colds
  • LAVENDER (Lavendula spp.) + LEMON BALM (Melissa officinalis) + CHAMOMILE (Matriaca chamomilla) + BASIL (Ocimum basilicum)
    Helps relieve headaches and stress
Sunkissed Dream // 4 Recipes for Herbal Teas promoting Health, Happiness & Energy


For the above infusions, I prepared them like this:
  •  one part each herb (totally about 6-8 tbsp dried herbs, 8-10 for fresh herbs)
  • put herbs into a quart size (or larger) glass jar with a tight fitting lid
  • fill the jar with boiling water (should completely cover the herbs)
  • let sit for 20-30 minutes (the longer they sit, the stronger they will be, and their taste can change dramatically)
  • strain herbs into a clean glass container, with a muslin cloth (best so you can squeeze out extra infusion) or a fine mesh strainer
  • finally, enjoy a cup hot or iced- with honey, lemon, milk, agave, or all of these!
  • You can pour the remaining infusion into a clean container and put in the refrigerator where it will keep for a couple of days
Sunkissed Dream // 4 Recipes for Herbal Teas promoting Health, Happiness & Energy

Another way to create a lovely and medicinal tea is to simply use a teapot with a filter in it, fill a reusable tea bag with your chosen herbs, or place the herbs right into the teapot if you like the way the beautiful herbs & flowers look floating around!
I usually use my glass teapot that I got on this page - or this one
Fill it with about an ounce of dried herbs (2 oz for fresh) and 12-16 oz water, bring to a gentle boil, let sit for 20 minutes, strain into your teacup, then enjoy!

Sunkissed Dream // 4 Recipes for Herbal Teas promoting Health, Happiness & Energy

If you don't have these herbs handy or can't get them at a store near you (check your local health food store), I'd suggest purchasing them here or here.

:::::::::::::::::::::::::::::::::::::::

HAPPY INFUSING!
Until next time, keep dreaming. xo


Monday, August 31, 2015

Sunkissed Recipe :: Super Seed Coconut Granola


Super Seed Coconut Granola Recipe // Sunkissed Dream


I love granola....on my yogurt, on my smoothies, as a cereal, on a hike, or just shoving a handful in my mouth when I'm feelin' hungry. It's so good as a snack or for breakfast, I just love it. 
I've been wanting to make my own granola for a while now, and finally got around to it! I've saved a few different recipes from Pinterest and kinda just picked and chose (did that sound weird?) from them to create my own granola divine! My husband loves a good bowl of cereal, so when he tried this and loved it, I really knew I was on to something.
Honestly, it's not complicated at all, so I'm really over-talking myself here....ha. It just takes a few extra minutes in the seed & grains aisle at your local grocery store to stock up on all the necessary ingredients. By making this yourself, you know exactly what's in it and aren't being fooled by healthy looking packaging that may contain a product with an excess of sugar, preservatives and processed ingredients!

Why your body will love what's in this:
  • hemp seed (a super food) is an amazing source of protein, that's easily broken down by your body
  • pumpkin seeds have free-radical fighting antioxidants, and contain zinc which is essential to a healthy immune system
  • these seeds also contain many essential fatty acids, including Omega 3 & 6
  • full of hearth healthy ingredients, including almonds
  • coconut flakes and oil are also full of good fats, helps prevent high cholesterol and high blood pressure
  • oats are always a delicious and healthy food, high in fiber and great for regulating digestion, keeping you "full" and boosting your immune system
Super Seed Coconut Granola Recipe // Sunkissed Dream


Here's the recipe, it's really fun to make! 
This makes a large amount that will last you a while. You can half the recipe if you don't want or need a lot.

INGREDIENTS (try to buy organic if you can)
  • 3 cups rolled oats
  • 1/2 cup hemp seeds
  • 1/2 cup pumpkin seeds
  • 1/2 cup sliced almonds
  • 1 1/2 cups coconut flakes (unsweetened)
  • 1 cup dried cranberries (or other dried fruit of your choice)
  • 1 tsp cinnamon powder
  • 1/3 cup coconut oil
  • 2/3 cup raw honey 
  • 1 tsp pure vanilla extract
DIRECTIONS
  • Preheat oven to 275' F.
  • Pour all dry ingredients into a large bowl and mix well. Set aside.
  • In a pyrex or other heat safe measuring cup, add wet ingredients together.
  • Place cup in a pot of simmering water, while stirring, until all wet ingredients have melted & mixed well together.
  • Drizzle the liquid mixture over your dry ingredients and mix together well! (You can sample it here!)
  • After everything is fully combined, pour granola onto a large baking sheet.
  • Place into the heated oven for 35-45 minutes, until golden and slightly crispy. Every 10-15 minutes mix the granola around on the pan so it cooks evenly.
  • Remove from oven and let cool completely. 
  • Transfer to an air-tight container (after you eat some), where it should last a few weeks if kept in a cool, dry place.
Super Seed Coconut Granola Recipe // Sunkissed Dream


ENJOY!!
Until next time. xoxo

Wednesday, August 19, 2015

Sunkissed Beauty :: Aloe Vera aka Goddess Juice

ALOE VERA // aloe barbadensis miller
in latin :: true shining bitter substance

Sunkissed Beauty :: Aloe Vera Benefits for Your Skin
photo via firstmatephoto

I'm always trying new mixtures, herbs and concoctions on my face & body. There's so many wonderful earthly creations for your face and skin, I feel like I could use something different everyday for the rest of my life!
 Lately, my skin has not been very nice to me, so I had to switch up what I have been doing for the last couple months. I read an interview of Megan Cannon on livingprettynaturally.com, where she said she has been using aloe vera on her face, neck & chest as a moisturizer every morning for the past 10 years. I never really thought to use aloe as a moisturizer each day...brilliant! Here's why:
+ aloe is 99% water so it gives your skin a TON of moisture
+ it contains a plethora of vitamins (A, C & E), antioxidants, minerals and enzymes
+ helps fight inflammation
+ contains properties that increase collagen content, soften skin, binds moisture to the skin, and tightens pores --- anti-aging goldmine.

I started using it each morning after my cleanser and toner, and it feels great. Moisturizing but not greasy at all, which is especially great in summer time. I encourage you try it out if you're looking for something different and all together BETTER for your beautiful skin. Let your epidermis drink this goddess juice.
Sunkissed Beauty :: Aloe Vera Benefits for Your Skin

Be careful which brand you get, as with anything, some are way better quality than others. The brand I have
(click here to get some), doesn't leave my face feeling sticky and is from organically grown aloe vera plants. I usually pour a small amount in a little jar to use for about a week then keep the rest in the fridge, so it stays good longer.

Sunkissed Beauty :: Aloe Vera Benefits for Your Skin
my big mama in the backyard
I also found this delicious cocktail recipe on hellonatural.co that calls for aloe, cucumber & mint leaves :: so good! The possibilities are endless with this "shining bitter substance". 

Until next time. xoxo


ps: much of the "scientific info" I have here came from this article.

Thursday, July 23, 2015

Sunkissed DIY :: Energizing Salt Scrub

Sunkissed Dream :: DIY Energizing Salt Scrub

I've been working on some new products for my skin care line this past week - herbal salt scrubs! I'll have them available in my shop within the next week hopefully! 
 There's endless options for scrubs :: salt, sugar, brown sugar, honey, herbs, clay, essential oils, fruit, veggies....& many more. The kind I'm focusing on are for your body and use sea salt or himalayan pink salt & organic oils as a base.
So since I'm on this salt scrub kick, I wanted to share a simple and delightful recipe with you. This particular one is great for morning time in the shower to get you energized and ready for the day! It's really not necessary to use soap or body wash every time you shower, as it can dry out your skin. Just using this scrub (or another similar scrub) cleanses and exfoliates in a natural and gentle way.

Sunkissed Dream :: DIY Energizing Salt Scrub

Sunkissed Dream :: DIY Energizing Salt Scrub

HERE'S THE RECIPE ::
This will make about 2 applications for your whole body, so you can double or triple it if you want to make a larger batch.

INGREDIENTS
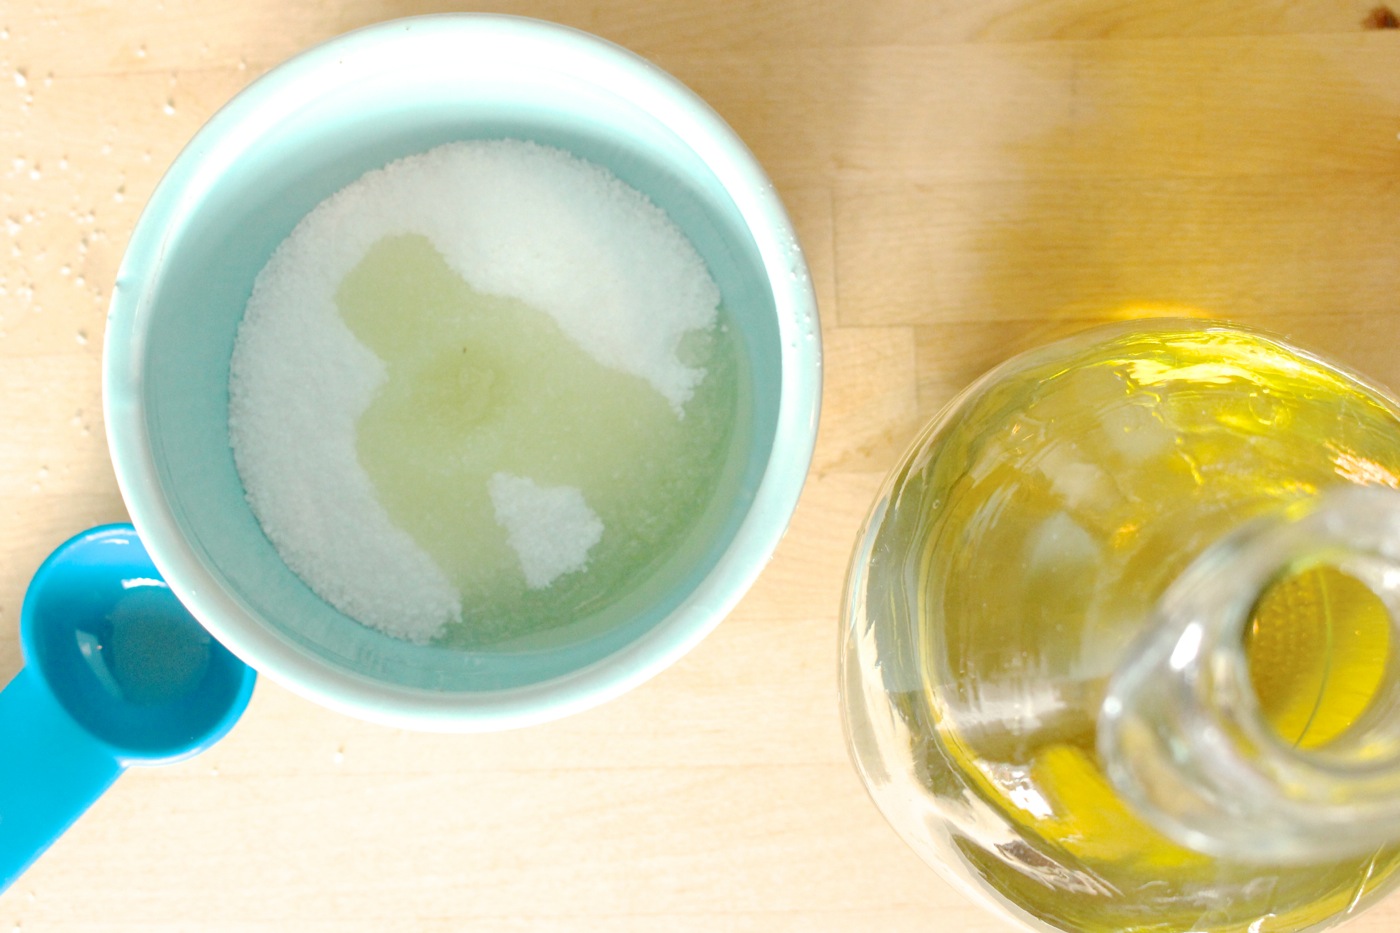
+ 3 tbsp mediterranean sea salt (fine ground) 
+ 1 tbsp organic extra virgin olive oil (this helps soften & nourish your skin, while the salt is removing dead skin)
+ 1/4 lemon, squeezed

Sunkissed Dream :: DIY Energizing Salt Scrub


DIRECTIONS
+ In a small bowl, mix up the salt & oil first, then squeeze in the lemon juice and stir again. If you find that it's still too dry, add more lemon juice or oil. 

+ Keep in mind, you don't want the scrub to be too moist, because then the oil & salt will separate AND you'll get your shower floor really slippery.

+ Once you have that nice consistency, you can transfer your mixture into a small glass jar, or if you're going to use it right away - just take the bowl to the shower!

Sunkissed Dream :: DIY Energizing Salt Scrub

// TO USE /
+ Scoop scrub onto damp hands to moisten mixture a little more.

+ Gently massage into damp skin. Don't rub too hard or you'll damage your skin's protective layer (and your skin will get really red). 

+ Spend extra time on your elbows, feet and knees. Don't forget about your hands! This works great on callouses and dry fingers and hands.

+ You should start to see water beading up on your skin - that's the olive oil working!

+ It's not necessary to moisturize after using this - so this scrub accomplishes a few steps of your morning (or evening) ritual!

Sunkissed Dream :: DIY Energizing Salt Scrub

There you have it. I hope you enjoy this scrub and try experimenting with your own combinations! Using only all natural & sunkissed ingredients on your skin feels so wonderful and your body will thank you for it, now...and in the long run.

Until next time. xoxo

Tuesday, June 9, 2015

Sunkissed DIY: Herbal Infusions with Olive Oil

The old saying goes, "good things come to those who wait," right? Well, that old proverb sure holds true when it comes to creating your own herbal infusions. I started about 7 new dried herbal infusions over the past couple days and already want to open them, smell them, and utilize their powerful properties! But, sadly I can't - yet. They just looked so beautiful, I had to take some photos. 

diy herbal infusions, herbal infusions with olive oil, how to infuse herbs, dried herbal infusions with oil, diy herb infusion, olive oil infusions, chamomile flowers, dried chamomile flowers, dried chamomile herbs, chamomile infused olive oil, diy chamomile infusions, chamomile herbal infusion

diy herbal infusions, herbal infusions with olive oil, how to infuse herbs, dried herbal infusions with oil, diy herb infusion, olive oil infusions, calendula infused olive oil, diy infused calendula, calendula herbal infusion

I'm making these for creams and salves, so I have them all infusing in organic, cold-pressed, extra virgin olive oil. I plan on doing tinctures (alcohol based) & some vinegar based hair rinse infusions as well- but I ran out of jars - so those will have to wait until I make a trip to Walmart again. 
  • The basic rule is 1 oz, by weight (I use a small digital scale), of freshly dried herb - to 4 oz carrier oil. 
  • For "fluffier" or flowery herbs, you'll have to use a few more ounces of oil in order to fully immerse the herb. They will absorb some of the oil, so just make sure you have enough oil to fully cover the dried herbs in your container/jar. 
  • Close your jar with a tight fitting lid, label it with contents & date, and let it sit for 3 to 6 weeks, shaking it everyday (or as often as you remember).
  • Once they're ready, line a bowl with a muslin cloth (you can put a strainer under the cloth as well), pour the contents of the jar into the cloth and let the oil seep through. Squeeze the bottom of the cloth, trying to get out as much oil as you can. Note that you will lose a small percentage of the oil, since the herbs drank it up!

diy herbal infusions, herbal infusions with olive oil, how to infuse herbs, dried herbal infusions with oil, diy herb infusion, olive oil infusions, chamomile flowers, dried chamomile flowers, dried chamomile herbs, chamomile infused olive oil, diy chamomile infusions, chamomile herbal infusion

I chose olive oil because it is one of the most stable oils (long shelf life), and is very emollient & great for most skin types. Since these infused oils are going to have new plant material introduced to them and will be sitting on the shelf for 3-6 weeks, you want to make sure they will not go rancid! Other stable oils are safflower, sunflower & palm kernel. Always make sure any oils you're using are cold pressed (nutrients are not lost by high heat processing) and preferably organic. 

diy herbal infusions, herbal infusions with olive oil, how to infuse herbs, dried herbal infusions with oil, diy herb infusion, olive oil infusions

My infusions consist of:
Burdock Root
Calendula Flowers
Comfrey Root
Chamomile Flowers
Chamomile Powder
Rosehips
St. Johns Wort

I get most of my herbs from a local health store, but I highly recommend Mountain Rose Herbs or Starwest Botanicals if you're purchasing online. 

diy herbal infusions, herbal infusions with olive oil, how to infuse herbs, dried herbal infusions with oil, diy herb infusion, olive oil infusions, calendula infused olive oil, diy infused calendula, calendula herbal infusion

diy herbal infusions, herbal infusions with olive oil, how to infuse herbs, dried herbal infusions with oil, diy herb infusion, olive oil infusions, chamomile flowers, dried chamomile flowers, dried chamomile herbs, chamomile infused olive oil, diy chamomile infusions

diy herbal infusions, herbal infusions with olive oil, how to infuse herbs, dried herbal infusions with oil, diy herb infusion, olive oil infusions, calendula infused olive oil, diy infused calendula, calendula herbal infusion

Can't wait to open these up in a few weeks! Happy infusing!

Until next time. xoxo

Friday, June 5, 2015

Sunkissed Salads: They'll Have Your Mouth Watering

I LOVE salads! They're so pretty and colorful to look at and have so much room for creativity! My mom taught me how to make the perfect, classic salad when I was little - it was always my job to make one for our family dinners after that. Lettuce, tomatoes, cucumber, green onions and homemade ranch dressing. I'd add cheese and pepper on top too. Now I know all that ranch and shredded cheddar cheese kind of cancelled out the point of eating fresh veggies- but at least I learned to love them at a young age, right?
Since I've exed the ranch dressing...my salads usually consist of spinach, tomatoes, avocado, orange or yellow peppers and dress it with olive oil & lemon juice (delish!). But now and again, when I have more time to prepare a "special" salad - I like to add even more fun ingredients, some type of meat, and use a different type of dressing.
So, here's 5 salads from some beautiful blogs I've found, that are packed full of even more nutrients and proteins, have a little sweeter side, or are just plain beautiful to look at (not to mention scrumptious)!


Tomato, Cucumber, Avocado Salad via Green Valley Kitchen

Sometimes you don't need any lettuce! And ripe, red cherry tomatoes are thee best!
--------------------


Watermelon Watercress Salad via A House in the Hills

This salad is perfect for warmer weather with the addition of sweet watermelon! 
--------------------


Jane's Mango & Coconut Salad via Autoimmune Paleo

You had me at mango...and then again at coconut.
--------------------


Shrimp Avocado Salad via Add A Pinch

This one reminds me of ceviche, but a little quicker to make - just say "shrimp" and I'll eat it!
--------------------


Grilled Pineapple, Chicken & Avocado Salad via Gimme Some Oven

This is like the perfect mix of fruit salad and veggie salad with yummy chicken to top it off!
-------------------------------------------------------------

Even if you're not a big salad person, I'm sure one of these will tickle your fancy. Now I need to go figure out which one I want to try tonight... 
(All photos are from their respective blogs/websites)

Until next time. xoxo

Friday, May 22, 2015

Sunkissed DIY: All Natural Dish Soap in 5 Minutes!

diy dish soap, home made dish soap, easy dish soap, all natural dish soap, diy easy dish soap, diy all natural dish soap, dish soap recipe, dish soap with castille soap, dish soap with essential oils, dish soap with super washing soda, making your own dish soap, how to make your own dish soap


On my quest to transition to natural skin care, hair care, and home care I have had a hate-hate relationship with all natural dish soap! I've been trying to perfect it for about 2 months now...UGH! I searched and searched and just kept coming across the same basic recipe: boiling water, grated soap, wait 24 hours, etc...I thought I was going to go crazy because each time I made a batch, it didn't work! I had to keep adding more of this and that and reheating. 
Anyways, enough of my rant...I'm sure those recipes I tried can work great for others but they just didn't seem to work for me; or maybe I'm simply not doing it right. But with the amount of dishes we do in my house (no dishwasher), I was spending like 30 minutes once a week just making dish soap- no thanks. So, in my unnecessary "anger" last week when the dish soap got all chunky and was barely sudsy (again), I started dumping stuff into my soap container, and to be honest it was the best batch I've made so far! I got so excited, I made my husband come see! He was excited too, since he usually does the dishes after dinner, and hadn't been too thrilled with my concoctions.
So I figured I should share my findings (thankfully I remember what I did) with other "dish-traught" dish washers, that are trying to be more sustainable and careful with chemical cleansers. As I said, I'm sure a lot of people have their own way that works great- but this is what works for me and it's so quick and easy (once you have the ingredients)!!
Without further adieu, 5 Minute DIY Dish Soap 

All these ingredients are things I would recommend having around your home if you're transitioning to natural cleaners, laundry detergent, beauty, hair care, etc- they all have unlimited uses!

diy dish soap, home made dish soap, easy dish soap, all natural dish soap, diy easy dish soap, diy all natural dish soap, dish soap recipe, dish soap with castille soap, dish soap with essential oils, dish soap with super washing soda, making your own dish soap, how to make your own dish soap

||  I N G R E D I E N T S  |
  • Pure Liquid Castille Soap | 1 cup + | - I use Dr. Bronners - there's all different scents you can choose from!
  • Super Washing Soda | 1 to 1 1/2 tbsp| - you can find this in the laundry/cleaners aisle of most any store.
  • Essential oils of Tea Tree, Lemongrass, Sweet Orange - these aren't necessary but aid in the antimicrobial & astringent properties of the soap (cleaner dishes/cleaner hands). They also give it a clean, citrusy scent! You can use one or all, or other essential oils of your choice, but I'd recommend using oils that have similar properties.
  • Vitamin E Oil | 1 tsp | (optional) - helps preserve the soap (even though you'll most likely use it before it goes bad), it also helps to soften the soap & keeps it from drying out your hands so much because of the washing soda.
  • Vegetable Glycerin | 2 tsp | (optional) - helps with suds & residue buildup, and also softens the soap. 
  • Hot water (you can also use distilled or bottled water if you think your tap water is too dirty to use for the soap).
  • An old dish soap container or a cute one like this- I like mine because I can mix the soap right there in the jar (yes- impatience again).
diy dish soap, home made dish soap, easy dish soap, all natural dish soap, diy easy dish soap, diy all natural dish soap, dish soap recipe, dish soap with castille soap, dish soap with essential oils, dish soap with super washing soda, making your own dish soap, how to make your own dish soap

||  D I R E C T I O N S  |
  • Fill your soap container half way with hot water (needs to be very warm so it can dissolve the washing soda).
  • Add 1 tbsp super washing soda (this works in my 16 oz soap container). If your container is bigger, I'd suggest adding another 1/2 tbsp.
  • Stir, shake, mix- whatever you want to do to get that soda dissolved!
  • Now fill up almost the whole rest of the soap container with your liquid castille soap- leave a little bit of room for the remaining ingredients if you're adding them.
  • Add in the Vitamin E oil & vegetable glycerin if you are using it, if not go on to the next step.
  • Add in 10-20 drops total of your essential oils. I do this:
    • 8-10 drops tea tree
    • 5 drops lemongrass
    • 5 drops sweet orange
  • Stir, shake, mix- get it all together! You're done-zo!!
diy dish soap, home made dish soap, easy dish soap, all natural dish soap, diy easy dish soap, diy all natural dish soap, dish soap recipe, dish soap with castille soap, dish soap with essential oils, dish soap with super washing soda, making your own dish soap, how to make your own dish soap

At first it will be pretty liquidy, but you can still use it! The consistency doesn't change the properties or effects of the soap.  It will thicken over time, so be ready to add a little warm water and shake it up again in a day or so if it gets too thick for you. I have found that this combination suds up very well, doesn't leave any residue on my glasses, and smells wonderful! This stuff fights grease and grime as good as Dawn or Ajax in my opinion!  Let me know what you think and I hope this works great for you!


Until next time. xoxo


Tuesday, April 10, 2012

Sunkissed Smoothie

Wanted to share this delicious smoothie recipe...its definitely my go-to smoothie on a warm summer day, or even during the colder months after a good workout.


These are the ingredients I always use for it, but you can use similar products 
that you already have or enjoy more. 

1. Pour half Orange Mango Juice (I love Santa Cruz Organic juices) and half Light Vanilla Soy Milk into blender.
2. Add mixed berries, fresh or frozen. I usually use blueberries, strawberries, and boysenberries.
3. Add one banana. Cut it into a few pieces so its easier to blend up.
4. I usually drizzle some agave nectar on top to sweeten it up a little.
5. Add a few cubes of ice, more or less, depending on how thick you want it.
6. Blend for about 30 seconds, or until all ingredients are mixed well and theres no ice chunks left to get stuck in your straw!
7. When I have it on hand, I sprinkle some fresh granola on top as well.
8. Sit back and enjoy a healthy and delicious smoothie that you made yourself!


Until next time, keep dreaming. xoxo